Backend Deployment
Overview
In this module, you'll deploy the BlazeNote backend application using Cloudflare Workers. As outlined in our Getting Started guide, the backend serves as the core API layer of our serverless architecture:
Backend Architecture Components:
- Runtime: Cloudflare Workers (serverless JavaScript)
- Framework: Hono.js for lightweight, fast API routing
- Database: Cloudflare D1 (SQLite-compatible) with auto-generated UUIDs
- File Storage: Cloudflare R2 (S3-compatible object storage)
- Image Processing: Cloudflare Images for optimized image uploads
- AI Integration: Cloudflare AI Workers for text summarization, translation, and chat features
This deployment establishes the foundation for your advanced note-taking application, providing API endpoints for note management, file/image uploads, AI-powered text processing, and secure data storage across Cloudflare's global edge network.
Deployment Methods
This module covers two deployment approaches:
- Git-based Deployment (Recommended): Automated deployment through Cloudflare Workers Builds
- CLI Deployment: Manual deployment using Wrangler CLI
Both methods will result in your backend being available at a global edge URL: blazenote-backend.<your-subdomain>.workers.dev
Steps
1. Install Dependencies and Test Locally
Before deploying to production, let's ensure your backend works correctly in your local development environment.
Navigate to Backend Project
First, ensure you have the backend repository set up:
If you're not sure how to open your terminal, refer to our Prerequisites Tools guide for detailed instructions on your operating system.
# Clone your forked repository
git clone https://github.com/YOUR_USERNAME/blazenote-backend.git
cd blazenote-backend

# Switch to the starter branch (workshop environment)
git checkout starter

# Or if working from ~/projects directory
cd ~/projects/blazenote-backend
Install Dependencies
npm install
What this installs:
- Hono.js framework: Lightweight web framework optimized for Cloudflare Workers
- AWS SDK for S3: For advanced R2 operations and pre-signed URL generation
- Wrangler CLI: Cloudflare's deployment and development toolkit
- TypeScript support: For type-safe development with Cloudflare Workers types
- Cloudflare Workers types: TypeScript definitions for D1, R2, and AI bindings
Verify Installation
Check that essential files exist:
ls -la
Required files you should see:
node_modules/directory (dependencies)package-lock.jsonfile (dependency lock)wrangler.tomlfile (Cloudflare configuration)src/directory (application source code)
Test Development Environment
Start the backend development server:
npm run dev
Expected output:
⛅️ wrangler 4.24.3
-------------------
⎔ Starting local server...
[wrangler:info] Ready on http://localhost:8787
✨ Total Upload: 0.xx KiB / gzip: 0.xx KiB
Verify API Functionality
Test the API endpoint: Open a new terminal window and test:
curl http://localhost:8787
Expected response:
Hello Blazehack!%

Stop the development server:
Press Ctrl + C in the terminal running the dev server
2. Deploy Using Git-based Builds (Recommended)
This method automatically deploys your backend whenever you push changes to your repository, providing continuous deployment capabilities.
Access Cloudflare Dashboard
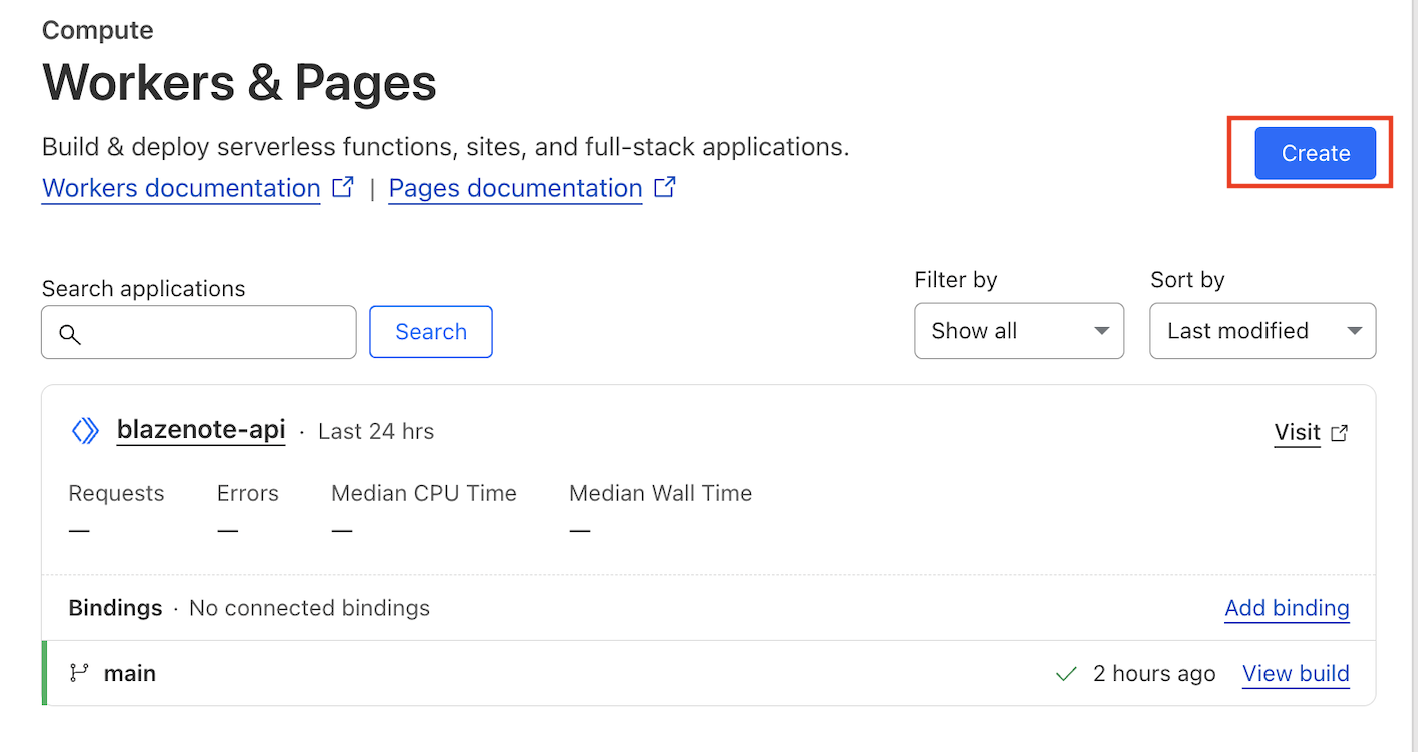
- Navigate to Cloudflare Dashboard → Compute (Workers) → Workers & Pages
- Under the Workers tab, click on Get Started for
Import a repository
If you already have the frontend created, the interface will be slightly difference, in which you can click on the Create button.
Link to GitHub for the first time
- From previous steps, click on
GitHub. - Select your account that you've forked the repository.
- Depends on your choice, you may select All repository or Only select repository.
- If you are using Only select repository, choose
blazenote-backendandblazenote-frontend - Once you are done, click Install & Authorize
- Then you'll be load back to Cloudflare dashboard.
3. CLI Deployment
If you prefer manual deployment or need immediate deployment control, use the Wrangler CLI method.
Prerequisites
Ensure Wrangler is authenticated:
wrangler login
On first-time login, a browser window will open prompting you to authorize access. Please grant permission to allow Wrangler to connect to your Cloudflare account.
Deploy Directly
# Navigate to your backend project
cd ~/projects/blazenote-backend

# Deploy to production
npm run deploy
Expected output:
 ⛅️ wrangler 3.15.0
-------------------
✨ Successfully published your Worker to https://blazenote-backend.<your-subdomain>.workers.dev
Select the account you used for Blazehack

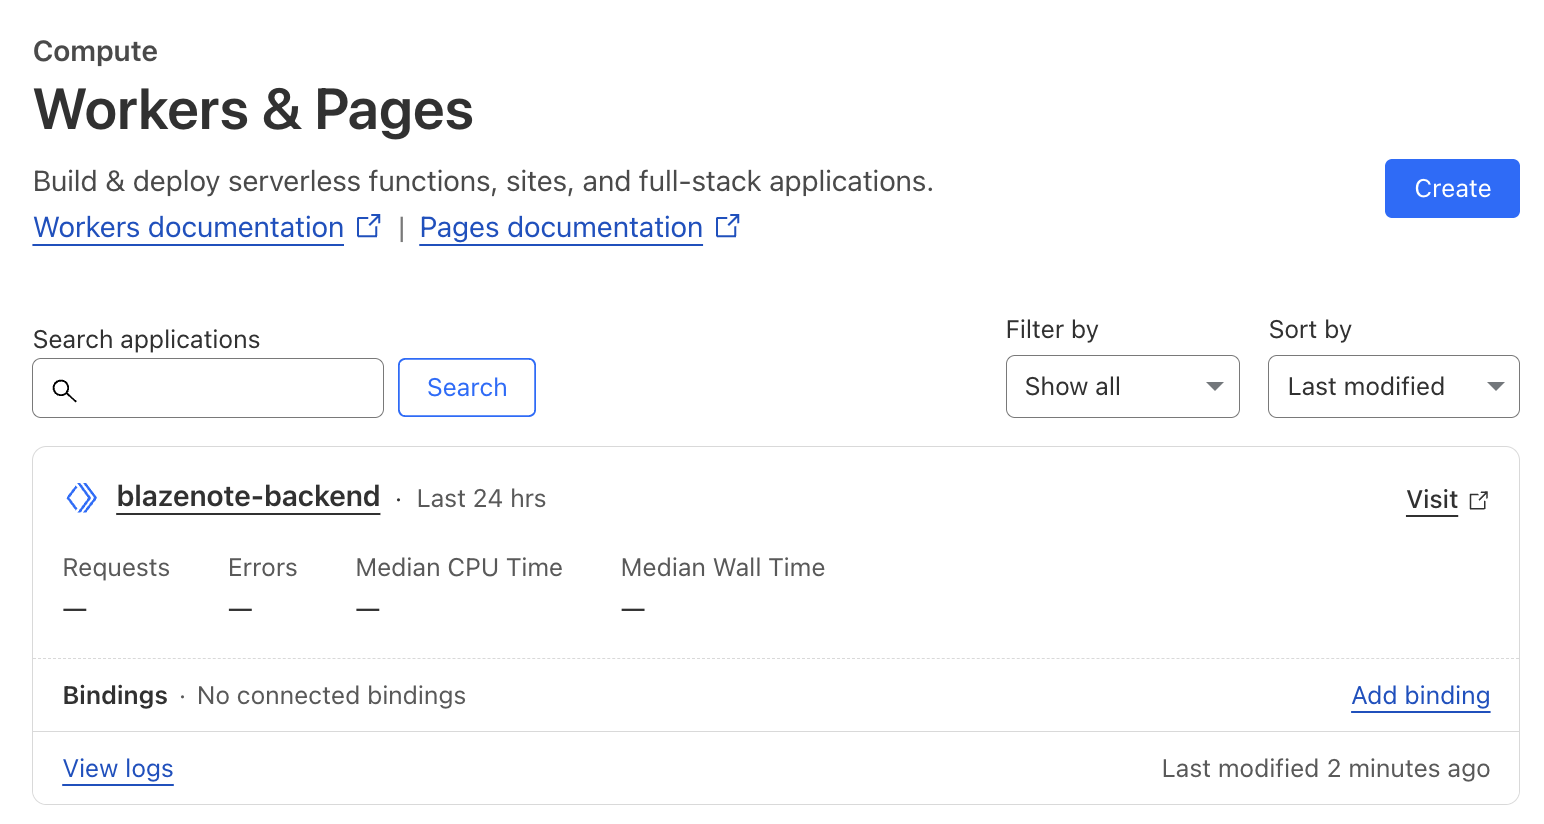
Once completed, you'll see the workers successfully deployed to Cloudflare dashboard
4. Access and Test Your Deployment
Get Your Deployment URL
For Git-based deployment:
- Dashboard: Workers & Pages →
blazenote-backend→ Deployments tab - URL format:
https://blazenote-backend.<your-pages-domain>.workers.dev
For CLI deployment:
- URL format:
https://blazenote-backend.<your-subdomain>.workers.dev
Test Your Live Backend
Basic connectivity test:
# Replace with your actual URL
curl https://blazenote-backend.<your-subdomain>.workers.dev
Expected response:
Hello BlazeHack!
Test API endpoints:
# Basic health check
curl https://blazenote-backend.<your-subdomain>.workers.dev

# Get all notes
curl https://blazenote-backend.<your-subdomain>.workers.dev/notes

# Test file upload endpoints
curl https://blazenote-backend.<your-subdomain>.workers.dev/files-workers/list

# Test AI features (requires POST with body)
curl -X POST https://blazenote-backend.<your-subdomain>.workers.dev/ai/title \
  -H "Content-Type: application/json" \
  -d '{"text": "This is a test note"}'
DNS propagation may take approximately 15–30 minutes. If you can't access your deployment immediately, proceed with the next module and return to test later.
5. Monitoring and Logs
Real-time Log Streaming
Monitor your Worker's activity in real-time:
wrangler tail blazenote-backend
Dashboard Analytics
- Go to Cloudflare Dashboard → Workers & Pages
- Select your
blazenote-backendproject - Click Metrics tab to view:
- Request volume
- Error rates
- Response times
- Geographic distribution
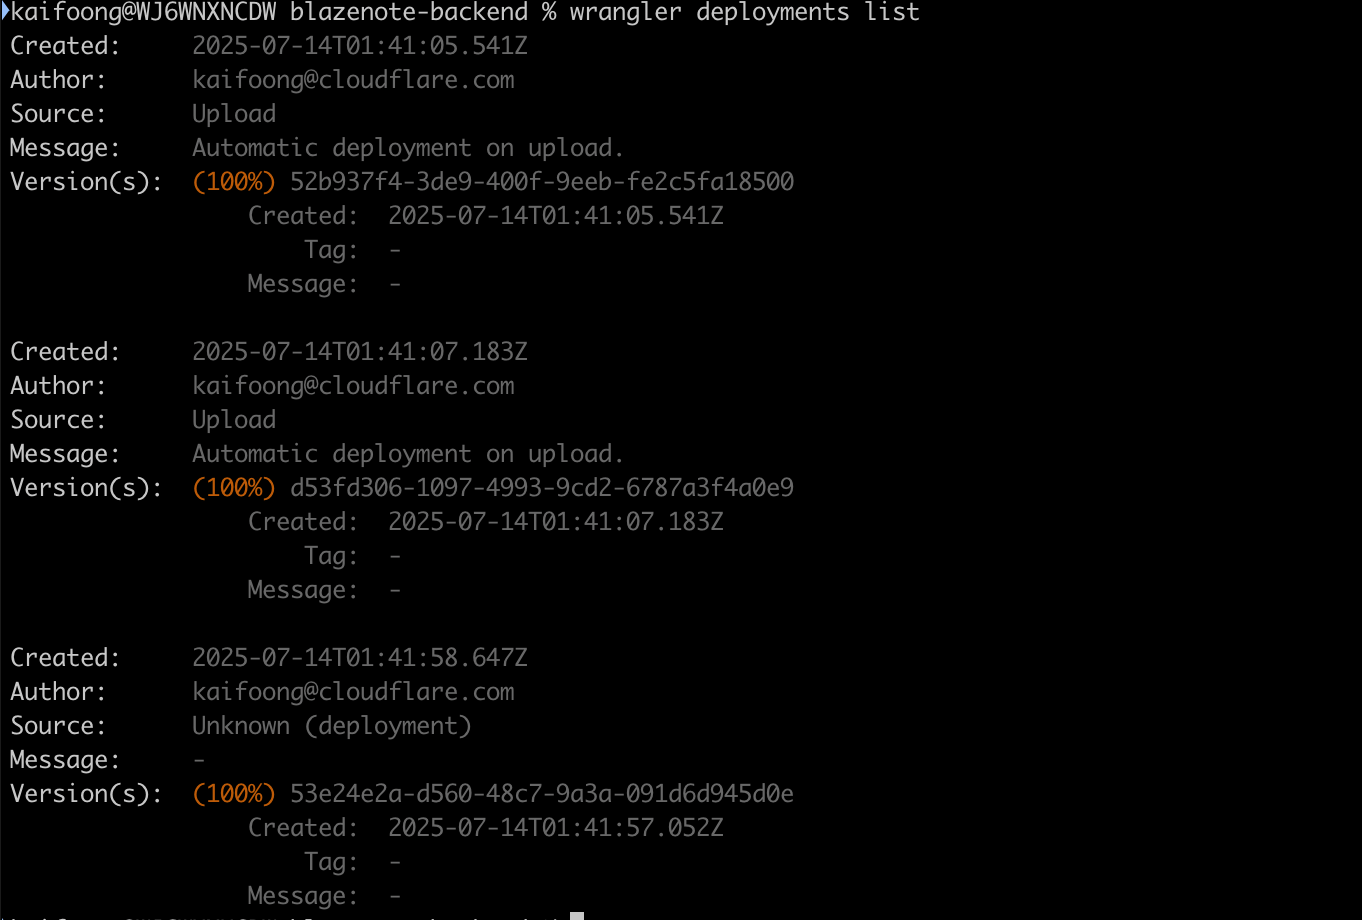
Deployment History
View past deployments:
wrangler deployments list
Backend Project Structure
Understanding your backend project architecture helps with debugging and future development:
cd ~/projects/blazenote-backend
tree -I 'node_modules' -L 3
Project structure:
blazenote-backend/
├── src/                    # Application source code
│   ├── index.ts           # Main application entry point with CORS setup
│   ├── types.d.ts         # TypeScript type definitions for bindings
│   └── routes/            # API route handlers
│       ├── notes.route.ts     # Note CRUD operations
│       ├── files.route.ts     # File management with pre-signed URLs
│       ├── files-workers.route.ts  # Direct R2 file operations
│       ├── images.route.ts    # Cloudflare Images integration
│       └── ai.route.ts        # AI-powered text processing
├── migrations/            # Database schema migrations
│   └── 0001_initial.sql   # Initial schema with UUID7 support
├── package.json           # Dependencies and scripts
├── wrangler.toml          # Cloudflare Worker configuration
├── tsconfig.json          # TypeScript configuration
└── README.md              # Project documentation
Available Scripts
Development and deployment commands:
# Local development
npm run dev              # Start development server at localhost:8787

# Deployment
npm run deploy           # Deploy to production with minification
Additional useful commands:
# Database management
wrangler d1 migrations apply blazenote    # Apply database migrations
wrangler d1 execute blazenote --local --file=migrations/0001_initial.sql  # Run migrations locally

# Monitoring
wrangler tail blazenote-backend           # View real-time logs
wrangler deployments list                 # View deployment history
Environment Configuration
Wrangler Configuration
Verify your wrangler.toml configuration:
cd ~/projects/blazenote-backend
cat wrangler.toml
Expected configuration:
name = "blazenote-backend"
main = "src/index.ts"
compatibility_date = "2024-12-30"
compatibility_flags = ["nodejs_compat"]

# Database binding
[[d1_databases]]
binding = "DB"
database_name = "blazenote"
database_id = "your-database-id"
migrations_dir = "./migrations"

# AI binding for text processing
[ai]
binding = "AI"

# R2 storage binding
[[r2_buckets]]
binding = "R2_BUCKET"
bucket_name = "blazenote"
preview_bucket_name = "dev-blazenote"

# Enable observability logging
[observability.logs]
enabled = true
Environment Variables
Required environment variables:
DB: D1 database binding (configured in wrangler.toml)R2_BUCKET: R2 storage binding (configured in wrangler.toml)AI: Cloudflare AI binding for text processing (configured in wrangler.toml)R2_ACCESS_KEY: R2 access key for S3-compatible operations (optional). We will this up in Module 3.R2_SECRET_KEY: R2 secret key for S3-compatible operations (optional). We will this up in Module 3.R2_ENDPOINT: R2 endpoint URL for S3-compatible operations (optional). We will this up in Module 3.
CORS Configuration
If you haven't done your frontend, you may now proceed to frontend-deployment
Update Allowed Origins
Important: Before your frontend can communicate with the backend, you need to update the CORS settings to include your frontend domain.
Edit the CORS Configuration
Open src/index.ts and update the allowedOrigins set:
// Define allowed origins
const allowedOrigins = new Set([
  "http://localhost:5173",           # Local development
  "https://<your-domain>.<tld>",     # Your deployed frontend domain. Example blazenote-frontend.pages.dev or blazenote.<SLUG>.sxplabs.com
]);
Replace with Your Frontend Domain
- For local development: Keep
http://localhost:5173for testing - For production: Replace
<your-domain>.<tld>with your actual frontend URL
Examples:
// If your frontend is deployed at blazenote-frontend.pages.dev
const allowedOrigins = new Set([
  "http://localhost:5173",
  "https://blazenote-frontend.pages.dev",
]);

// If using a custom domain
const allowedOrigins = new Set([
  "http://localhost:5173",
  "https://my-blazenote.com",
]);
Deploy the Changes
After updating the CORS settings, redeploy your backend:
npm run deploy
Frontend-Backend Communication: Your frontend will not be able to make API calls to the backend until the CORS settings include your frontend domain. This is a common source of connection issues.
Validation Checklist
Local Development
- Backend dependencies installed successfully (
npm install) - Development server starts without errors (
npm run dev) - Backend responds correctly at
http://localhost:8787 - All required project files present
-
wrangler.tomlconfigured with correct bindings - TypeScript compilation successful
Deployment
- Cloudflare account connected and authenticated
- Repository connected to Cloudflare Pages (for Git deployment)
- Build process completes successfully
- Worker URL accessible and responding
- API endpoints return expected responses
- Environment variables configured correctly
Integration
- Database connection working (D1 binding active)
- File storage accessible (R2 binding active)
- CORS configured for frontend domain (see CORS Configuration section)
- Monitoring and logs accessible
Troubleshooting Guide
Common Build Issues
❌ "Module not found" errors
# Clear node_modules and reinstall
rm -rf node_modules package-lock.json
npm install
❌ TypeScript compilation errors
# Check TypeScript configuration
npx tsc --noEmit
# Fix type errors in src/ files
❌ Wrangler authentication issues
# Re-authenticate with Cloudflare
wrangler auth logout
wrangler auth login
Common Deployment Issues
❌ "Worker exceeded CPU time limit"
- Check for infinite loops in your code
- Optimize database queries
- Review middleware performance
❌ "Binding not found" errors
- Verify
wrangler.tomlbindings configuration - Check D1 database ID is correct
- Ensure R2 bucket exists and is accessible
❌ CORS errors from frontend
- Symptoms: Browser console shows "blocked by CORS policy" errors
- Solution: Update the
allowedOriginsinsrc/index.tsto include your frontend domain - See: CORS Configuration section for detailed instructions
// Common CORS error fix - update allowedOrigins in src/index.ts
const allowedOrigins = new Set([
  "http://localhost:5173",
  "https://your-frontend-domain.pages.dev",  # Add your actual frontend URL
]);
Best Practices
Development Workflow
- Local Testing: Always test locally before deploying
- Environment Separation: Use different configurations for development/production
- Version Control: Commit all configuration files except secrets
- Database Migrations: Use migrations for schema changes
Deployment Strategy
- Staging Environment: Test deployments in a staging environment first
- Rollback Plan: Keep previous working versions for quick rollback
- Monitoring: Set up alerts for error rates and performance issues
- Documentation: Keep deployment procedures documented
Security Considerations
- Environment Variables: Never commit sensitive data to version control
- CORS Configuration: Restrict CORS to specific frontend domains
- Input Validation: Validate all incoming request data
- Rate Limiting: Implement rate limiting to prevent abuse
Next Steps
🎉 Congratulations! Your backend is now deployed and running on Cloudflare Workers.
What you've accomplished:
- Backend API deployed to Cloudflare's global edge network
- Database and storage bindings configured
- Continuous deployment pipeline established
- Monitoring and logging capabilities active
Next up:
- Frontend Deployment: Deploy your React application to Cloudflare Pages
- CORS Configuration: Update backend CORS settings with your frontend domain
- Integration Testing: Connect frontend and backend applications
- Database Setup: Initialize your D1 database with required schemas
- File Storage: Configure R2 bucket for file uploads
Your backend is now ready to handle:
- Note Management: Full CRUD operations with automatic UUID generation
- File Storage: Direct R2 uploads and pre-signed URL generation
- Image Processing: Optimized image uploads via Cloudflare Images
- AI Text Processing: Summarization, translation, paraphrasing, and chat functionality
- Database Operations: Structured data storage with automatic timestamps
- Cross-Origin Requests: CORS-enabled API for frontend integration
[ PLACEHOLDER: Add screenshot showing successful workers dashboard ]